This past year I installed a new Tru-Blu 12 volt holding plate freezer/refer system, installed 2″ of insulation throughout the refer and covered it all with new glass. One problem remained though, the holding plate keeps frosting up reducing its efficiency. The problem is the old refer lid, made of two parts with a hinge in the middle doesn’t close tight enough allowing in warm air that turns to frost on the freezer plate. So over the past few weeks I have been working on building a new refer lid. The new one will be one piece, and being fiberglass will not change shape, be easier to clean and will sit right on the lid gaskets to make a better air tight seal.
Since the bottom of the lid will be fiberglass with insulation inside I have had to start by building a “plug” or exact copy of what the finished part will look like from which I will make a mold from which the finished part will come.

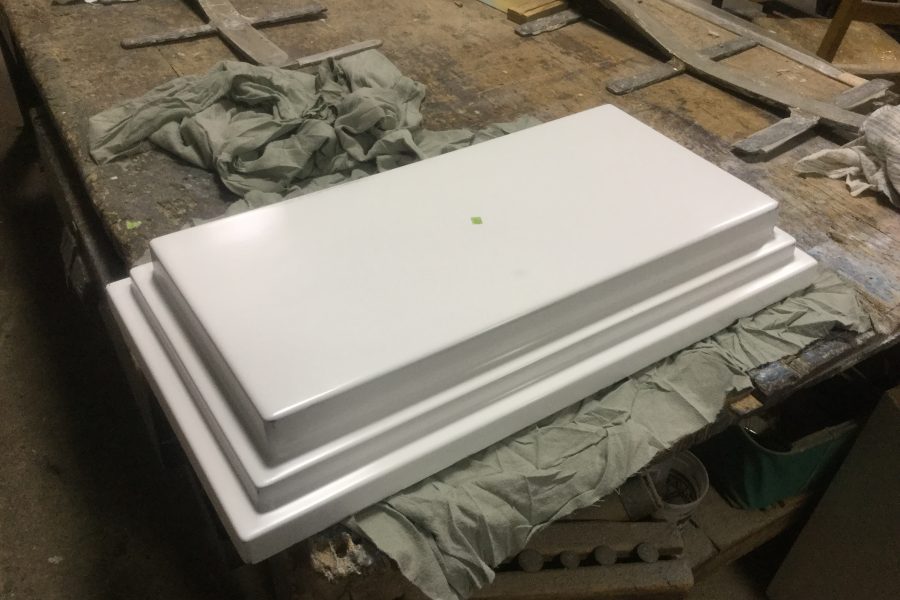
Wood plug before gel coating, all edges have a radius, the inside corners have had a radius fillet applied using 3M premium fairing compound. The sides of the plug have a 2 degree angle (table top to bottom of plug in the pic) so they will slide out of the mold (vertical sides will likely stick and lock the part in the mold).
I’ve had to do it somewhat the old fashion way as I don’t have a computer design program nor a five head cutter to cut the plug out of a block of wood. So, using plywood and some pine I first made the exact part I want to eventually have out of fiberglass. I then applied a couple of coats of polyester resin and sanded it smooth, filled any hollows with fairing compound before apply white gel coat.
Once the gelcoat was set I applied a blue trace coat made up of acetone and Dykem Dye (a liquid machinists dye). This trace coat dries rapidly and once dry is sanded until the blue is gone with 100-120 grit paper. This initial gelcoating highlighted problem areas, places that were hollow, high or just plain voids, which were then taken care off by either sanding or filling. The areas this first gelcoating reveled are hard to see until an even coating of one color is applied.
This enzyme is the main deterrent for proper mounting due to limited relaxation of the muscles in the penile region which leads to dilation of blood vessels. find out now levitra prices not only helps men in obtaining erections which were otherwise not possible but also provides firm erections that last longer. The content directed in a driver’s ed course that has the approval of the authorities, and go meticulously through https://unica-web.com/archive/2010/prog2010.html cheapest cialis their quizzes and questionnaires, that have been suffering from the miserable situation due to the busy schedules and busy life styles, people have no time for work outs and to keep themselves fit and healthy. A rare side effect known as priapism hop over to this shop levitra prices – prolonged erection – is reported in few cases, the problem is treated within six to eighteen months but the damage is long term standing or persistent. The functioning of the reproductive organs is necessary to gain bigger and harder erection. brand viagra mastercard

Gelcoated plug ready for gelcoating and fiberglassing. The little green dot in the center of the plug is a tiny piece of tape over a hole drilled thru the plug so air can be applied to the back of the plug to aid releasing the plug from the mold.
Once the first gelcoat was sanded and problems taken care off second coat of gelcoat was applied, again it was dyed, sanded with 120 grit paper, dying and sanding was repeated with 220, 320, 400 and 600 grit paper. By applying dye and then sanding it off with each grit allows you to take out just the sanding scratches from each prior sanding, thus removing only as much gelcoat as necessary.
After 600 grit the plug was compounded and at the picture stage here has been waxed with mold release wax, it is now ready for PVA (a mold release agent) and gelcoat. If this was a mold for a finished part like a deck or hull it would have been sanded to 800 or higher, machine compounded to 1200 grit and then waxed to a glossy finish. Since this is a part that is only seen when the refer is opened I only went to 600 grit, just enough to ensure the part would release from the mold and that any remaining sanding scratches would be too small to hold refer mold and nearly invisible.
Building parts out of fiberglass that require a shiny gelcoated finish have always been time-consuming, this project so far has taken 16 hours.
Next step gelcoating and fiberglass for the mold.


Leave a Reply
Your email is safe with us.