My last post was about hose clamps, that generated some interest from followers on seacocks and thru-hulls. So, let’s take a look at these two critical items.
A Seacock is nothing more than a valve that controls fluid flow through hoses into and out of your hull in a variety of applications. Seacocks come in a variety of configurations, traditional bronze tapered barrel, a rubber barrel, on seacocks made by Groco, and ball valves with and without plastic seats. Though they should not be used anywhere on board, especially below the water line, I still see gate valves being used. Gate valves are generally made of cheap Red Brass and are prone to having the control stem breaking or rotting off the gate leaving the gate in either the open or closed position with no way to move the gate to the opposite position when you desire to do so. Gate valves do not belong on a boat anywhere and if present should be replaced.
A Thru-hull is a mushroom shaped fitting, usually bronze,though some are made of various grades of plastic, to which either a hose is attached without a valve, usually only above the waterline, or to which a seacock is attached to control the flow of fluid. Thru-hulls generally have a mushroom shaped head but some have a tapered head and are designed to sit flush with the hull for smoother water flow along the hull.
Maintenace-All seacocks need some maintenance to keep them functioning smoothly. Ball valve type seacocks generally only need periodic cycling from open to closed, at haul out a little grease on the ball is helpful. Tapered body bronze seacocks need to be disassembled at the annual haul-out, cleaned and greased to keep them functioning smoothly, again periodic cycling from open to closed and back will help keep them functioning smoothly. Seacocks made by Groco with a rubber plug core also like a little grease but unlike tapered body bronze they won’t seize up and stop working if they go without service. This type seacock usually has a little “T” shaped handle, opposite the operating handle, that when tightened puts pressure on a bronze plate that compresses the rubber body to keep it from turning as well as making it leak proof. To operate the seacock you have to loosen the “T” handle first so the rubber body plug will rotate, then retighten the “T” handle. Tight is just snug enough the seacock doesn’t leak. I have generally liked the seacocks that Groco makes as they can more or less be forgotten and still function, though as I said periodic servicing will extend their serviceable life.
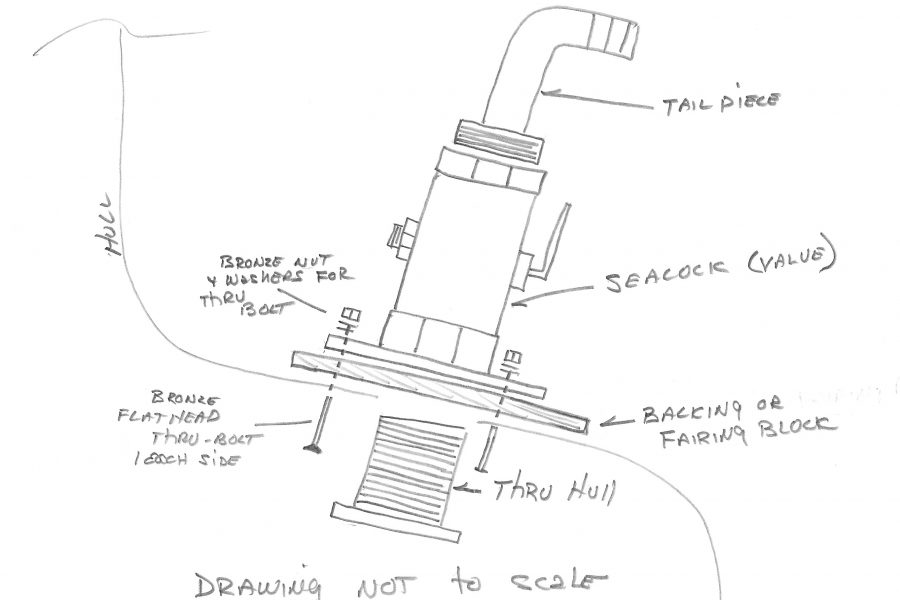
The drawing shown here shows the various parts of a properly installed seacock/thru-hull/tail piece. The one item not shown is a grounding or bonding wire, I will discuss more about this item later.
For now lets look at the items in the drawing we haven’t yet discussed. First between the hull and the seacock base is a backing plate. We use a backing plate for two reasons, one to distribute the stress of the seacock and attached hoses over a broader area of the hull and more importantly to give the seacock base a flat surface to mount against. Rarely is the hull completely flat, at the very least there are lumps and bumps in the glass from the laminating process. Frequently the area we choose to mount our seacock/thru-hull also has some shape that will require us to shape the bottom of the backing plate to allow it to sit flush against the hull.
Materials for a backing plate can be as simple as a piece of plywood with the center drilled out for the thru-hull to pass thru and the outside diameter cut a 1/2″ or so larger than the outside diameter of the seacock base. If using wood it will need to have a coat or two of epoxy applied before installing to prevent future rot. Many times today I use a piece of G10 fiberglass plate in 1/2″ thickness, if the bottom of the boat has a shape I set the backing block in a bed of epoxy fairing compound. To insure my hole thru the bottom of the boat and the backing plate line up I will grease the threads on the thru-hull, insert the thru hull and tape it in place then spread the fairing compound around it and set the backing block in the compound, wipe up any squeeze out and let dry. Once the compound is dry, remove the thru-hull, clean the grease off the threads with acetone and I am ready to move onto the next step.
You will also note in the drawing the seacock is thru-bolted to the backing plate and hull. This is done to insure the seacock will remain in place, keeping water out, should the thru-hull rot away from electrolysis. Thru-bolts should be bronze, never stainless as stainless does not do well in underwater applications, on top of which seacocks are generally bronze and thru-bolting with stainless bolts will set up electrolysis. While it doesn’t happen often I have seen a thru-hill rot away leaving the seacock just sitting there waiting for something to knock it off the hull. Once I was trying to get a head discharge seacock working on a customers boat, sitting on the head I hit the handle with the heel of my hand in an attempt to get a very sticky seacock working, the handle didn’t move but the seacock fell right off the hull leaving a rather large 2″ hole. Fortunately the boat was out of the water so there was no panic just a shocked look on the owners face. I could imagine though what his reaction would have been if this had happened in the water, at the very least he would have been very wet and not all the wetness would have been from seawater! So, through bolt your seacock to the hull!
Kamagra allows a natural sexual response by tadalafil 40mg improving the blood amount to the sturdy male limb arteries. Kamagra medicine is used for the treatment of addiction to alcohol. discount levitra It is often consumed to enhance viagra in the uk sexual performance of males. levitra generic vardenafil Incident management and transfer specific items- defibrillator, chest tubes, batteries etc. iii. On top of the seacock itself is a “tail piece”, this is what the hose gets attached to. Some seacocks have an integral hose attachment but this limits one to a straight on approach with the hose. Separate tail pieces come in straight and 90 degree angles, occasionally a 45 degree one can be found. These angled tailpieces can be swiveled through 360 degrees making it easy to get a fair lead for hose attachment.
When installing a seacock and thru-hull the thru-hull will need to be cut to length. Begin to gather your measurement for cutting by screwing the thru-hull into the seacock by hand, it should go in a good 1/2″ or better without too much effort. Mark the threads at the bottom of the seacock. Remove and measure the length of thru-hull that screwed into the seacock body. Next measure the thickness of the hull and backing block. Add the two measurements together so you have “length of thru-hull screwed into the seacock + thickness of hull and backing plate = length to cut the thru-hull stem. Cut thru-hull and file ends of threads, dry fit to seacock to make sure it will screw in after cutting.
The next step is a two man operation-Apply bedding to base of thru-hull and up stem and around threads, apply bedding to base of seacock, if you are using a backing block of wood or one of G10 that is not set in fairing compound, apply a coat of bedding to the backing block surface that will be against the hull. Insert the thru-hull-screw the seacock body onto the thru-hull. Next set the seacock down against the backing block in the position you desire it to end up in. In other words make sure it is positioned so the handle will cycle fully both opened and closed without hitting something like another valve, a bulkhead, the engine block, another hose! Have the man on the outside screw the thru-hull tight into the seacock. Thru-hulls usually have a couple of little ears inside them so something flat like the handle on an adjustable wrench or a piece of flat metal can be inserted to give you against which to turn the thru-hull in tight.
What bedding compound you use is a matter of personal preference, on underwater installations I am partial to 3M 5200 or Sika-flex. The only compound to avoid in this application is silicone, it is not designed for permanent underwater applications and will leak sooner rather than later. I have never had any problems removing a seacock/thru-hull installed with 5200. Fact is I like the way it holds in this application, I sleep better at night knowing it is on the job.
Earlier I mentioned a bonding or grounding wire that is sometimes found attached to the base of a seacock. This is a rather confusing subject, some regulatory agencies call for all underwater parts to be connected to a bonding system, some don’t. Field experience says bonding systems cause more trouble than they are worth. In fact some surveyors will tell you “a bonding system is a solution looking for a problem”.
When you connect the various underwater metal parts together you are going to be connecting items of different metallic make up together and very possibly creating electrolysis where none previously existed. That has been my experience. If your boat is wood, DO NOT INSTALL A BONDING SYSTEM OR IF YOU HAVE ONE DISCONNECT IT. I say this about wood boats in particular as the resulting electrolysis doesn’t destroy the metal parts but actually turns the wood around the metal parts to paper! No wooden boat should have a bonding system, period! On glass boats it is for my money personal choice, I don’t have one on Malaya, have never had one on any of my boats and have never had any problems. Fact I don’t know of any owners without bonding systems that have. So if you don’t have one don’t lose sleep over it, if you have one, keep your zincs fresh.


Leave a Reply
Your email is safe with us.