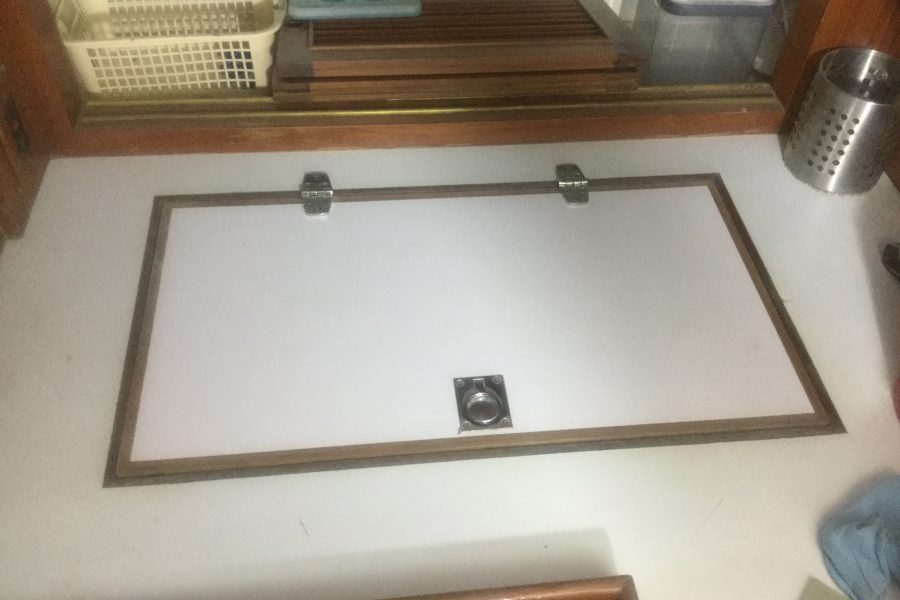
I first wrote about building a new lid for Malaya’s refer back in February of 2018, in that article I wrote about building a plug for a fiberglass part, https://oldsaltcruising.com/2018/02/09/new-refer-lid/, since then the lid has long been finished and in the ensuing months I have had plenty of opportunity to run the refer and test the new lid. The results have been overwhelmingly positive, compressor run time as well as amps used are down and best of all the freezer plate no longer ices up!
On the electrical side of things our daily use of battery power for refrigeration has gone from 40 amps to 24 amps in a 24 hour period, and as I mentioned no more icing on the holding or freezer plate. In the past I would have to defrost and remove a 1/4″ or more of ice off the holding plate about every two weeks. The ice that formed on the holding plate was indicative of an air leak in the lid letting in warm air. Since installing the new lid there has been no need to defrost the plate.
As I mentioned in the February article, Malaya’s freezer/refer holding plate had a problem, mainly the holding plate kept icing up which not only used more energy but also didn’t keep the freezer/refer box as cold as it should have. The problem was the old wooden two-part hinged in the middle lid. It didn’t fit tight enough nor did it have much in the way of insulation to keep the cold in and the cabin heat out.
A couple of years ago I replaced the old Adler Barbour freezer/cooling plate with a Cool Blue 12v holding plate. At the same time, I added 2” of insulation on all sides of the refer box and topped it with 1/8” fiberglass panel. The freezer and refer were divided by a 1” thick foam wall with fiberglass on both sides, a 2” hole with an adjustable cover at the bottom of the panel lets cold air from freezer side into the refer and is then distributed around the refer by a small 2-D-cell fan that is sold by the RV industry for RV refers. We immediately saw an improvement in our amperage from over 60 amps per day to just under 40 amps per day. The only remaining problem was the pesky air leak that allowed the freezer plate to develop thick ice every two weeks.
To remedy the problem I decided a new one-piece insulated fiberglass lid was in order. Since ordering a custom lid that would fit properly would have been expensive, I fell back on my early days of fiberglass work in a tooling shop and built my own lid.
To build any fiberglass part one must first build a plug, an exact copy, in both size and finished surface, of what the finished product will look like. For the plug, I used ¼” plywood for the flat surfaces and ¾” pine for the vertical surfaces. Once the plug was roughed out I radius all outside edges with a router, the inside radius along the verticals was made using fairing compound and a piece of round wood dowling with sandpaper.

The Plug, ready for gelcoating
When building a plug it is important to keep in mind that for the mold to release from the plug, and later on for parts to release from the mold that all vertical surfaces must have a slight positive angle to them of at least 2°, any negative angle will effectively lock the plug or part in the mold, quickly ruining the project and necessitate you starting from scratch.
Once the plug is made, it is coated with gelcoat and sanded through multiple grits to a minimum of 600 – 800 grit, (more detail on building, sanding and finishing a plug can be found in the February article, see link in first paragraph) and then compounded, after which it is ready for waxing with mold release wax. When it comes to waxing I like to apply at least 5 coats of wax with at least an hour of dry time between wax coats.

The mold
After the last coat of wax, I also apply a light coat of PVA (polyvinyl alcohol) to ensure the part will release from the mold!
Next, To add stiffness to the edge of the mold and to keep the edges of the mold from curling inward I set and fastened the mold on a flat surface covered with 6 mil plastic. I would have preferred to set it on a smooth waxed Formica covered surface but didn’t have one available, thus as you can see in the pics where the plastic wrinkled as the glass cured. It wasn’t a problem here as this surface would be cut off the finished part.
The next step was to spray the mold with gelcoat, here I used up some leftover red and white to get a contrasting color for the mold. The contrasting color makes it easier to see how much gelcoat you are applying to the plug and later on when you gelcoat the mold for the finished product you can again see how much gelcoat you are applying. In general you should aim for a wet film thickness of 20mils or you risk having resin show through the gel coat.
When the gelcoat has cured you are ready to laminate the part. For the mold, I used just glass matt except for the very final layer of glass. This allows the mold to be a little bit flexible to aid in getting the part out. No roving was used as a mold this small doesn’t need any structural strength except that provided by the matt. The one layer of cloth I applied was just to keep any matt fibers laid down so later on when handling the mold I wouldn’t get a glass splinter in my hands.

The new lid, fresh out of the mold
Once the glass on the plug is cured the question is will the plug release from the mold, while I am usually pretty confident it will there is always the chance I goofed somewhere and the two parts are locked forever together. To release this mold from the plug I used some wood wedges around the edges to pop the mold off the plug.
Once the mold was off the plug I wiped it down with acetone and then coated it with 5 coats of wax and a coat of PVA before gelcoating with 20 mils of white gelcoat. Once the gelcoat was dry two layers of 1.5 oz matt were laid in and wet out followed by a layer of 10 oz boat cloth and one more layer of 1.5 oz matt.
Once all was cured the new refer lid was popped out of the mold and ready to be cut to its finished height.

The finished lid in place on the refer
Once the finished height was determined and the lid cut to the correct height it was filled with foam. For foam I used 1″ sheet foam cut to fit tight with a layer of Aluminum foil in the bottom to reflect heat.
Next, the top, built of epoxy coated 5/8″ Okoume plywood with Formica on top and teak edging, was attached and foam strips of 1/4″ EDF rubber weather-stripping were laid on the landing surfaces the lid was ready for installation on the refer.

The finished lid, gasket material was self-adhesive 1/4″ EDF foam
Overall this little project used up about 30 man hours, 25 hours to make a plug, mold and finished part and 5 hours to assemble and install.
In total I spent less than $150.00 on materials (fiberglass, resin, gelcoat, plywood, teak, hinges, foam, latch, Formica, fasteners). To keep the costs down I must admit that more than a few items were scraps from other projects, such as the teak used, came out of my teak scrap pile. I save every piece of teak until I cannot even build a toothpick out of it as it is just too expensive to throw out even small scraps. The Formica came out of a large piece I bought for another project as did the Okoume plywood. So, my major expenses were for hinges, glass, resin and gelcoat.


Leave a Reply
Your email is safe with us.